⚠️ Supported versions: Geyser currently supports Minecraft Java 26.2 and Bedrock 26.30–26.52. If your server runs an older Java version, install ViaVersion. Full details: Supported Versions.
GeyserMC is a free bridge that lets Minecraft: Bedrock Edition players (mobile, console, and Windows Bedrock) join your Minecraft: Java Edition server. Together with Floodgate, Bedrock players can join without needing a paid Java account.
This guide covers installing and configuring Geyser on Paper/Spigot, Fabric, NeoForge, or proxy software (Velocity/BungeeCord) using PloxPanel.
1. Download Geyser
- Go to the official download page: https://geysermc.org/download
- Select the correct build for your software:
- Paper / Spigot / Purpur → Geyser-Spigot
- Fabric → Geyser-Fabric (requires Fabric API)
- NeoForge → Geyser-NeoForge
- Velocity / BungeeCord → Geyser-Velocity or Geyser-Bungee
⚠️ Mod note: Geyser only works with server-side mods. Mods that require a client-side installation will not work for Bedrock players. Geyser-Fabric and Geyser-NeoForge only run on a 26.2 server. More info: Supported versions – Fabric/NeoForge.
⚠️ Plugin note: If your server is running a version older than 26.2, you will need to install ViaVersion. See the supported versions page.
2. Install Geyser on Your Server
- Paper / Spigot / Purpur: Place the
Geyser-Spigot.jar in the /plugins/ folder.
- Fabric / NeoForge: Place the corresponding jar in the
/mods/ folder.
- Velocity / BungeeCord: Place the jar in the proxy’s
/plugins/ folder.
ℹ️ Proxy tip: Install Geyser only on the proxy server. You can (and should) install Floodgate on all backend servers for better skin support and network-wide Floodgate API availability. All servers on the network must accept 26.2 Java clients, as Geyser imitates one.
3. Restart Your Server
Restart the server (or proxy) so Geyser can generate its configuration files.
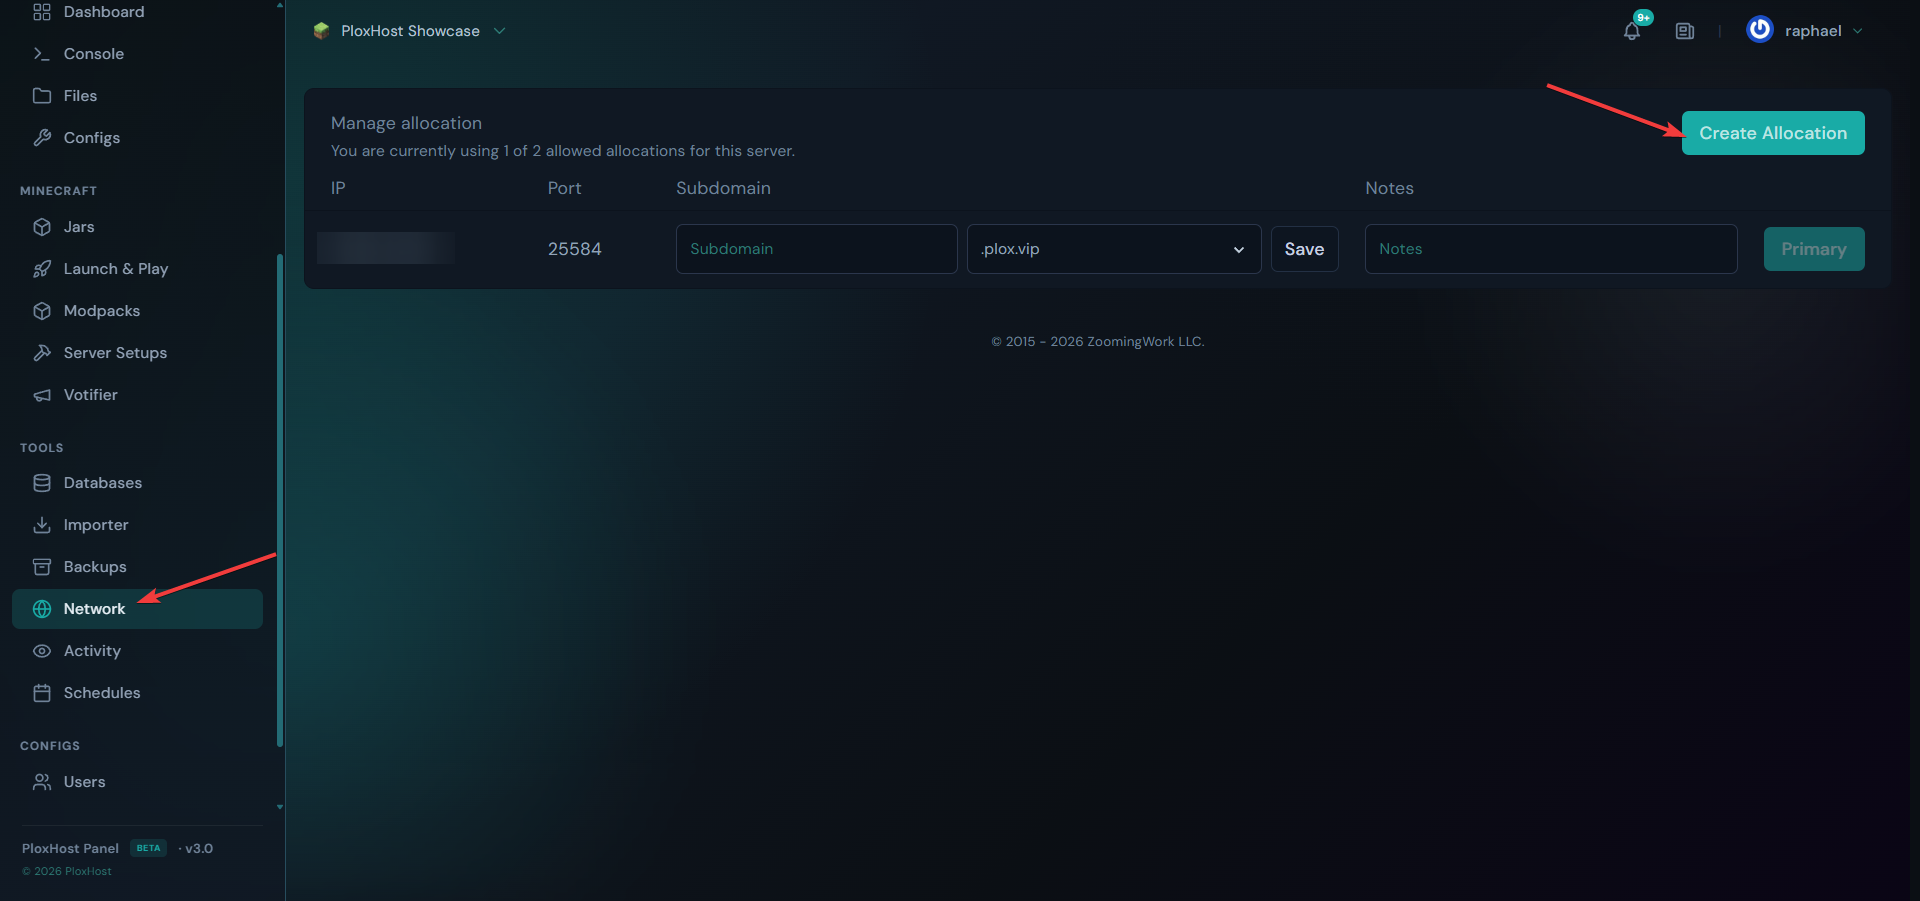
4. Create a New Port Allocation in PloxPanel
Bedrock Edition uses UDP. You need a dedicated port for Geyser.
- In PloxPanel, go to Network.
- Click Create Allocation.
- Note the new port that is assigned to your server. You will use this port in the Geyser config.
5. Configure Geyser
Open the correct config file depending on your software:
- Paper / Spigot:
/plugins/Geyser-Spigot/config.yml
- Fabric:
/mods/Geyser-Fabric/config.yml (or config/Geyser-Fabric/config.yml)
- NeoForge:
/mods/Geyser-NeoForge/config.yml
- Velocity / BungeeCord:
/plugins/Geyser-Velocity/config.yml or /plugins/Geyser-Bungee/config.yml
Find the bedrock: section and update it:
bedrock:
  # The IP address that will listen for connections.
  # Generally, you should only change this if you want to limit what IPs can connect to your server.
  address: 0.0.0.0
  # The port that Geyser will listen on for incoming Bedrock connections.
  # Since Minecraft: Bedrock Edition uses UDP, this port must allow UDP traffic.
  port: 19132          # ← Change this to the port you created in PloxPanel
  # Some hosting services change your Java port every time you start the server
  # and require the same port to be used for Bedrock.
  # This option makes the Bedrock port the same as the Java port every time you start the server.
  clone-remote-port: false
⚠️ Vital: The port value is the port Bedrock players will use to connect. Change it to the allocation you created in step 4.
If you enable clone-remote-port: true, the Bedrock port will be overwritten with the Java port every time the server starts.
After editing, save the file and restart the server.
6. Install and Configure Floodgate (Strongly Recommended)
Why use Floodgate?
- Allows Bedrock players to join without owning a Java Edition account.
- Authenticates players via their Microsoft/Xbox account.
- Provides proper Bedrock skins for Java players.
- Exposes a useful API for other plugins.
- Prevents username conflicts by adding a configurable prefix (default:
.).
How to install Floodgate:
- Download Floodgate from https://geysermc.org/download/?project=floodgate (choose the matching platform: Spigot, Fabric, Velocity, etc.).
- Place the jar in the same
plugins/ or mods/ folder as Geyser.
- Restart the server to generate Floodgate’s config.
- Open Geyser’s
config.yml and set:
auth-type: floodgate
(This is usually under the remote: or java: section depending on your Geyser version.)
- Restart the server again.
Full official instructions: https://geysermc.org/wiki/floodgate/setup/
⚠️ Proxy networks: Install Floodgate on the proxy. For best results (skins + API), also install it on every backend server and follow the key-sharing steps in the official guide.
7. Connecting from Bedrock
Bedrock players should add a server using:
- Address: Your server IP or domain
- Port: The port you set in the Geyser
bedrock: section
Java players continue to connect normally using the original Java port.
If Bedrock players still cannot connect, run geyser connectiontest <your-ip> <bedrock-port> in the console for diagnostics, or contact support with the results.